
Technical Tip
If Micronet doesn't automatically display the Goods Received Header screen, select HEADER on the Goods Received screen.
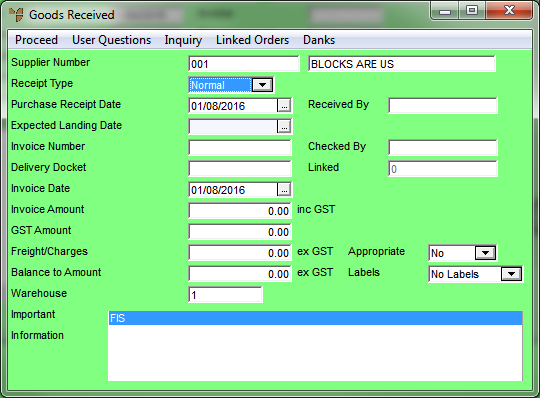
Whenever you create a new goods received batch, or load an existing one, Micronet displays the Goods Received Header screen where you enter the main details of the goods received batch.
Refer to "Creating a New Goods Received Batch" or "Recalling a Goods Received Batch".
Micronet displays the Goods Received Header screen.
|
|
|
Technical Tip If Micronet doesn't automatically display the Goods Received Header screen, select HEADER on the Goods Received screen. |
|
|
Field |
Value |
|
|
Supplier Number |
Micronet displays the ID and description of the selected supplier. |
|
|
|
Technical Tip If you choose to assign this goods receipt to an MJC job, Micronet will automatically display this supplier on the MJC Add Items to Job screen (refer to "Adding Materials to a Service Job"). |
|
|
Receipt Type |
Select the receipt type:
2.8 Feature You can only select one receipt type per goods received batch. Once you have started adding items to a batch, if you return to the Goods Received Header screen and change this field, Micronet displays a message that you cannot have a combination of Normal and Sundry items on a receipt. |
|
|
Purchase Receipt Date |
Micronet displays today's date. Enter or select the purchase receipt date that you want stored in your purchase history file - that is, the date the goods were delivered. |
|
|
Expected Landing Date |
If required, enter or select the date the goods are due to be delivered. Orders can be flagged at an intermediate stage of On Order but with an Expected Landing Date of xx/xx/xx. This information can be used in reports and inquiries for sales and purchasing staff. 2.8 Feature If this goods received batch is allocated to a backorder and you change the expected landing date in this field, and if the Update Delivery Date on Backorder field in your company settings is set to Yes, Micronet will also update the Expected Delivery Date - Supplier on the backorder when the goods received batch is posted as confirmed (refer to "Edit - Program - Purchasing" and "Entering Backorder Lines"). |
|
|
Invoice Number |
If the receipt is costed and you have the supplier’s invoice, enter the invoice number. This number will be posted to the Micronet Creditors Ledger (MCL). If you have a delivery docket but not the supplier’s invoice (uncosted), leave this field blank. |
|
|
Delivery Docket |
If the receipt is uncosted, enter the receipt reference (usually the delivery slip number). This reference is the one Micronet uses to recall the transaction for reconciliation with the supplier’s invoice when it arrives. If the receipt is costed, leave this field blank. |
|
|
|
Technical Tip If you enter an Invoice Number, you must always POST COSTED to complete the goods receipt. If you enter a Delivery Docket number, you must always POST UNCOSTED to complete the goods receipt. You can enter data in one field or the other, never in both. For more information about posting costed and uncosted, refer to "Managing Completed Goods Received Batches". |
|
|
Invoice Date |
Enter the date on the supplier's invoice, or leave this as today's date if a settlement discount should be calculated from the date received. This date will be posted to MCL. |
|
|
Invoice Amount |
If the receipt is costed, enter the total invoice amount including GST. If it is uncosted, leave this field blank. |
|
|
GST Amount |
Micronet calculates and displays the GST amount. You should check that this is correct and change it if required. |
|
|
Freight/Charges |
If the supplier invoice has any freight or extra charges that you want to spread across the items being received, enter the amount excluding GST. |
|
|
|
Technical Tip If the goods were received on a PDA, these four fields default to what was entered on the PDA – refer to "Mobile Goods Receipt - PDA Procedures" in the Mobile Applications manual. |
|
|
Appropriate |
Select Yes if you want Micronet to appropriate the Freight/Charges amount evenly over the all the items on this receipt by dollar value (and increase the cost of the items received), or No if you want to accept this amount separately through to your Micronet General Ledger (MGL) Freight expense account. This will not affect the landed price of your line items being received. |
|
|
Labels |
While you can select a quantity of labels to be printed on each goods receipt line – see the Labels field on the Enter Goods Received Line screen – this field allows you to select a label quantity which applies to every item in the goods received batch. Select whether you want labels created for this goods receipt and the quantity required. Options are:
When you select any option other than No Labels, Micronet creates a batch with the items and label quantities specified when the goods received batch is posted. To recall this batch for viewing, altering, printing or deleting, refer to "Inventory Reports - Batch Label Report". |
|
|
|
Technical Tip The default option displayed in this field depends on the setting in the Default Labels field on the Purchasing Configuration screen – refer to "Edit - Program - Purchasing". |
|
|
Balance to Amount |
Optionally, enter the amount you want Micronet to balance to. This is usually the total of the delivery docket if the invoice has not been received. At the end of the receipting process, Micronet warns you if this balance does not equal the total of all the order lines. |
|
|
|
Technical Tip If you are using supplier contracts, Micronet balances the calculated landed costs against the Balance to Amount. |
|
|
Warehouse |
Enter the warehouse for Micronet to post this receipt of stock to, or press spacebar then Enter to select a warehouse. |
|
|
Important Information |
Micronet displays any added text in the Supplier master file that is assigned to display as important information on goods received. |
|
|
Received By |
Micronet displays the ID of the PDA user who received the goods. 2.8 Feature You can enter a different user if required. |
|
|
Checked By |
Micronet displays the ID of the PDA user who checked the goods receipt batch. |
|
|
Linked |
|
If you are processing a costed receipt, Micronet displays the Dissect Receipt screen. Refer to "Dissecting a Goods Receipt" for information on using that screen.
If you are processing an uncosted receipt, Micronet redisplays the Goods Received screen.